Dans ce tutoriel, nous décrirons comment Centreon peut superviser vos ressources déployées dans la plateforme cloud Microsoft Azure.
Pour rendre les choses plus simples, nous étudierons l’exemple suivant : comment superviser une machine virtuelle Azure avec Centreon ? Cela vous expliquera les bases de la supervision des services Azure à l’aide des Plugin Packs Centreon. À partir de là, vous pourrez appliquer ces connaissances à tous les services Microsoft Azure disponibles dans notre catalogue de Plugin Packs et ainsi les superviser.
** La suite de cet article et le tutoriel sont rédigés en anglais **

1. Creating Centreon credentials to access the Azure Monitor service
Centreon draws from the Azure Monitor service in monitoring your Microsoft cloud assets. Azure Monitor collects performance metrics from all Azure services, stores them for 90 days, and makes them available through the Azure API. Centreon provides a set of Plugin Packs and their associated plugins to connect to the API and periodically fetch and monitor these metrics.

Your first step is to create the credentials that will identify and authorize Centreon Plugins to access the Azure Monitor API. This is done through another cloud service: Azure Active Directory.
From your Azure web portal, follow the step in this Microsoft documentation procedure: Use the portal to create an Azure AD application and service principal that can access resources. In the Azure AD dialect, the Service Principal is the identity (ie a private key) the Centreon Application will use to connect to the API.
You should now have the four information Centreon Plugins required to access Azure Monitor API:
- Your Azure subscription ID
- Your organization tenant ID (directory/tenant ID)
- The client ID for the Centreon application (client/application ID)
- The client secret for this application (client secret/secret ID)
2. Download the Centreon Plugin Packs to monitor Microsoft Azure cloud services
Plugin Pack Manager is the name of the Centreon user interface to list, download and update the 300+ Plugin Packs.
- Read the Centreon Plugin Packs documentation to install the latest Plugin Packs if your platform is offline.
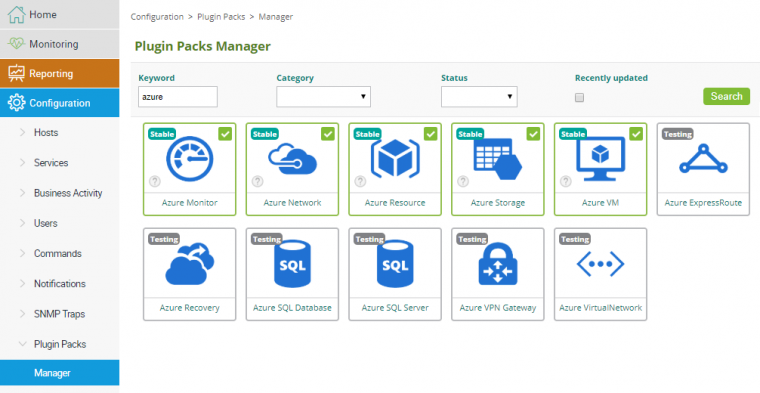
From the Configuration > Plugin Packs > Manager user interface, search ‘azure’ to access the Microsoft Azure Plugin Packs:

In this tutorial we’re assuming you want to monitor your Azure Virtual Machines: download or update the Azure VM Plugin Pack. As usual, the ‘?’ button will automatically redirect to the relevant Monitoring Procedure. Let’s now detail this Monitoring Procedure.
3. Installing the associated Plugin on the Centreon Poller
The Azure VM service is monitored by the centreon-plugin-Cloud-Azure-Compute-VirtualMachine-Api Plugin, which belongs to the open source Centreon Plugin library and is thus available from the Centreon standard repository.
- Use the CentOS/RedHat package management yum command to install the Plugin on its Centreon Poller:
# yum install centreon-plugin-Cloud-Azure-Compute-VirtualMachine-Api
- This will also install all the prerequisite packages:
JSON::XS
DateTime
Digest::MD5
Digest::SHA
LWP::UserAgent
LWP::Protocol::https
IO::Socket::SSL
URI
URI::Encode
HTTP::ProxyPAC
Note: this plugin supports two connection modes (API and AZCLI) but we’re only showing here the procedure for the preferred API mode.
4. Verifying your Azure Monitor credentials
It’s always a good practice to first verify the credentials we’ve created with Azure AD are valid. This can be done by testing the Plugin from the Command Line Interface.
- This command will list all the Virtual Machines associated to your Azure subscription:
# /usr/lib/centreon/plugins/centreon_azure_compute_virtualmachine_api.pl --plugin=cloud::azure::compute::virtualmachine::plugin --custommode='api' --mode=list-resources --subscription='06c592d0-7eb8-4036-a292-04f0d1deb015' --tenant='1ef32fd9-bad6-4928-9750-ef7a1c094ee0' --client-id='e828a21e-eef9-4541-loki-b1891a48961e' --client-secret='2/98Udjd89Zscwaazjdd983bddjvfy783=' --api-version='2018-10-01'
- If the credentials indicated in the parameters subscription, tenant, client-id and client-secret are valid, this command should return something like this:
List vitual machines:
[name = MYPRODUCTIONVM1][computername = MYPRODUCTIONVM1][resourcegroup = RGPROD][location = westus][vmid = f9cb621d-291d-4bbe-b1fd-ae84a32a3bd4][vmsize = Standard_DS3_v2][os = Linux][state = -][tags = criticity:Production]
[name = MYPRODUCTIONVM2][computername = MYPRODUCTIONVM2][resourcegroup = RGPROD][location = westus][vmid = 9d9c4115-ebe0-48e2-bbcd-fe8e80c0ff6e][vmsize = Standard_B2s][os = Windows][state = -][tags = criticity:Production]
Note: if the Poller requires a proxy server to access the API, add to the command the –proxyurl option followed by the proxy server url.
5. Using the Plugin Pack to start monitoring
The installation of the Azure VM Plugin Pack brings the Cloud-Azure-Compute-VirtualMachine-custom Host Template.
To start monitoring your first Azure virtual machine, add a new Host in the Configuration > Hosts > Hosts user interface:
- The IP adress / DNS parameter should be set to localhost
- Add the Cloud-Azure-Compute-VirtualMachine-custom template
- Set its Custom Macros with your credentials
| Macro | Description |
|---|---|
| AZURESUBSCRIPTION | Subscription ID |
| AZURETENANT | Tenant ID |
| AZURECLIENTID | Application ID |
| AZURECLIENTSECRET | Private Key |
- Identifying the Azure VM you want to monitor:
| Macro | Description |
|---|---|
| AZURERESOURCE | Resource ID or Resource Name |
| AZURERESOURCEGROUP | Resource Group Name (if you used Resource Name above) |
- Check the option to Create Services linked to the Template too: this will automatically create 4 Services
- These 4 services are defined by the Service Templates included in the Plugin Pack:
| Azure VM Service Template | Service Alias | Metrics |
| Cloud-Azure-Compute-VirtualMachine-Cpu-Credit-Api | Cpu-Credit | cpu_credits_remaining_average |
| cpu_credits_consumed_average | ||
| Cloud-Azure-Compute-VirtualMachine-Cpu-Usage-Api | Cpu-Usage | percentage_cpu_average |
| Cloud-Azure-Compute-VirtualMachine-Diskio-Api | Diskio | disk_read_bytes_average |
| disk_write_bytes_average | ||
| disk_read_operations/sec_average | ||
| disk_write_operations/sec_average | ||
| Cloud-Azure-Compute-VirtualMachine-Network-Api | Network | network_in_average |
| network_out_average |
You are now ready to generate the configuration, export it and send it to the Poller:
- Follow the two steps of the Deploying Configuration procedure in the Centreon documentation.
You may now verify Centreon is collecting metrics for your Azure VM in the Monitoring > Status Details > Hosts user interface:

Done! Your Centreon platform is now monitoring your Microsoft Azure virtual machine.
Tip: the Configuration > Hosts > Templates user interface lets you modify the Cloud-Azure-Compute-VirtualMachine-custom template to save the credentials in the relevant macro once and for all.
6. What’s next?
You can now use any Custom View widget to view and share your Azure monitoring data.
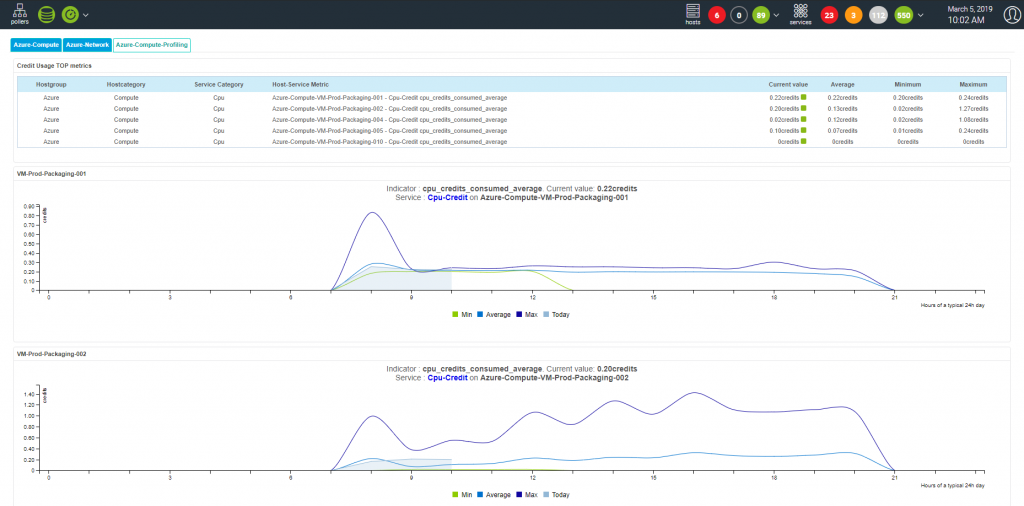
For example, say you’re mostly concerned with Credit Usage, you may want to display the daily credit usage and compare it to your average typical day using the Typical metric performance day widget:

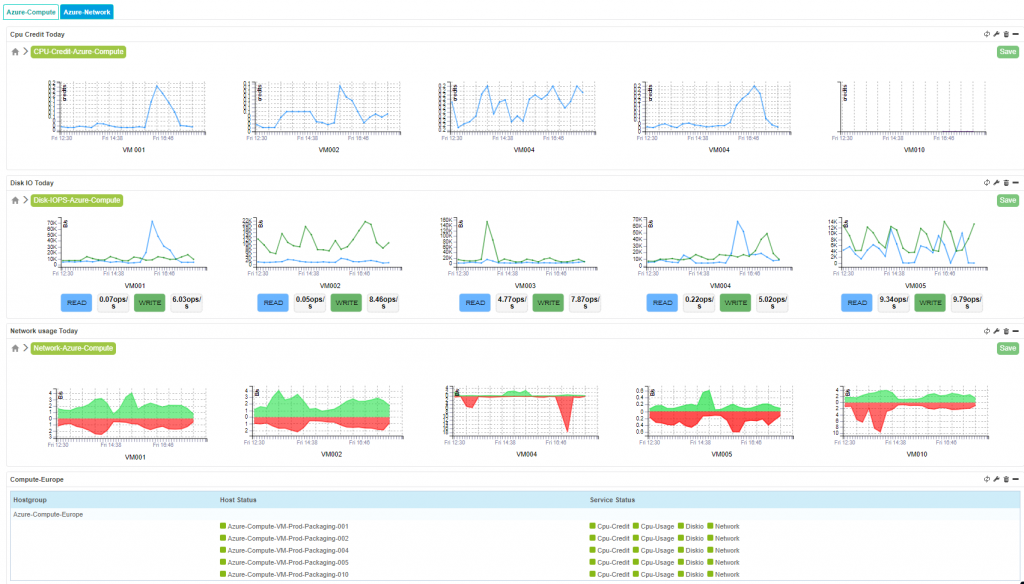
Or you may want to compare the performance of multiple VMs on a single view, using the Centreon MAP Graphs widget:

You will also want to apply the same procedure to monitor other Microsoft Azure Services such as ExpressRoute, SQL Server, SQL Database, or Storage:
- This Centreon Plugin Packs documentation lists all the Plugin Packs available in the latest version of Centreon.
- For each Plugin Pack, the documentation lists the Service Templates available.
- Once installed, the ‘?’ button displays the procedure you should follow to use the Plugin Pack.
Centreon offers over 300 turnkey integration-ready plugin packs for instant cross-domain monitoring. Looking for other IaaS or cloud monitoring integration? Search what’s available in our Plugin Pack catalogue. If you don’t find what you need, tell us and we’ll work to add it.


